Jekyll2024-03-25T09:40:31+00:00https://fernandobasso.github.io/feed.xmlFernando BassoProgramming, command line, open source and all things Linux/*nix, networking and technology in general.A Math Poem in Star Wars Intro Fashion2021-03-12T18:03:00+00:002021-03-12T18:03:00+00:00https://fernandobasso.github.io/web-development/math-poem-star-warsThis short post is just a means of collecting a few links to a small toy project of mine which features a math poem by Millôr Fernandes displayed in Star Wars intro style 💫.
It is written in vanilla HTML, CSS and JavaScript. The interesting part is related to the CSS which is the core of the animation. Here’s the Gitlab repository so you can take a look at the code if you so desire.
NOTE: I will use ECMAScript, some JSDoc syntax, and concepts extracted from the awesome How to Design Programs book to exemplify the subject under discussion in this post, but it can be adapted and transferred to any other programming language. The ideas here are more important than the specific syntax for one given programming language.
What does it do‽ Given the name ‘sum’ you can most certainly infer it must perform an addition of some sort and that the input x is probably a number. Can you guess what it really does without running it‽ Can you mentally (or on paper) follow the logic and tell the output if the input x is 5‽
Self-Documenting Code
The first order of business would be to give it a more specialized name than the very generic ‘sum’. Let’s try naming it ‘sumFrom1To’:
OK. Now we know that this function, given its more meaningful name, sums numbers from 1 to some given number x. We assume x is a number because we are talking about summing something (or adding something), and that operation is performed on numbers.
Also, note that the name of the function is made more meaningful because of name of the parameter. The meaning of both combined are more clear in context than in isolation. Aloud, it reads like “sum from one to x”. Without the x, it would read “sum from one to…” To what‽ Indeed, the x parameter really helps a lot to understand the function name and purpose and vice-versa.
We could also have named the parameter ‘n’ or ‘num’, or ‘end’, ‘endNum’, ‘upperBound’, ‘upperBoundNum’, etc. In this case I would really go the the simpler ‘x’ or ‘n’ because it is concise and clear enough in context.
Adding Documentation
Human languages are not mathematical (with a precise notation and meaning) and therefore are always susceptible to interpretation. Yet, although we were not explicit about it, we might also infer that it sums all numbers between 1 and the given number x.
That is, “sum numbers from 1 to x” does not mean “sum only certain (even, odd, etc.) numbers from 1 to x.” It mostly likely means all numbers from 1 to 0.
So far, we have not added any explicit documentation to our function. Let us do it now and — to the best of our ability — try to make it useful, concise and precise:
/**
* Sum all numbers from 1 to x.
*
* @param {number} x
* @return {number}
*/functionsumFrom1To(x){if(x===1)return1;returnx+sumFrom1To(x-1);}
It helps a lot for someone just taking a quick glance at it!
Adding Even More Documentation
Let us now turn aur attention to the parameter x‽ We are basically calculating a sum of a range of numbers here. That poses yet another question: is the range inclusive or exclusive‽ That is, are both 1 and x included in the sum‽ Ranges and things that split strings and arrays have peculiarities regarding the upper bound number. Generally, the lower bound is almost always inclusive, while the upper bound is is sometimes inclusive, sometimes exclusive. It depends on the language or operation being performed.
About Ranges and Indexes
Take Haskell and Ruby and a range from 1 to 3. For the sake of example let us add 10 to each number in the range:
The upper bound of the range is inclusive in both cases. That is, the upper bound is used, included in the computation. However, take this string slicing function in ECMAScript:
$ node --interactive
> 'The Force!'.slice(0, 5);
'The F'
Index 5 is “o”, but it was not included in the result. In this case, the upper bound is exclusive. Ruby behaves the same as ECMAScript when slicing arrays and strings. Haskell take also considers the upper bound not inclusive:
$ ghci
λ> take 5 "The Force"
"The F"
And there you have it! There are some differences in how the edges of ranges and indexes are handled in languages.
Back To Our Documentation
With the discussion above, we can arguably be confident that we’d better be clearer and explicit about x being included in the computation or not. Let’s suppose that after careful consideration and some talk with a colleague, we decided that for this situation we want x to be inclusive, and update our doc comment appropriately:
/**
* Sum all numbers from 1 to x, inclusive
*
* @param {number} x
* @return {number}
*/functionsumFrom1To(x){if(x===1)return1;returnx+sumFrom1To(x-1);}
We could also use a slight variation on the way to denote the inclusiveness (or not) of x, and write the comment something like this:
/**
 * Sum all numbers from 1 to x.
 *
 * NOTE: x is included in the range.
 *
 * @param {number} x
 * @return {number}
 */
Or perhaps, better yet:
/**
 * Sum all numbers from 1 to x.
 *
 * NOTE: both 1 and x are included in the range.
 *
 * @param {number} x
 * @return {number}
 */
It may look overly cautions and we may have even been redundant about 1 being also inclusive, but better a little precaution than a great regret. It is at least completely clear that both edges of the range are inclusive.
Adding Assumptions to the Documentation
There is one more important point we can tackle before we can definitely say we have written good enough piece of documentation for our function.
Take a look at the base case: it returns 1 when x === 1. Also note that we are recursively invoking the function, decreasing 1 each time for the purpose of reaching the base case and avoid an infinite recursive chain of calls that would lead to a stack overflow. But what happens if we call the function with 0 or a negative number‽ Exactly! An infinite loop culminating in a call stack overflow!
We have a few courses of action to opt for. One would be to decide that if our function is passed a number less than 1, then it would always return 0, or NaN, or throw an exception, or whatever else we might find appropriate.
Another approach would be to settle on requiring client code to guarantee they’ll pass the expected arguments and blow up in their faces if they do not input valid values.
No matter what we choose, our function would be best understood and used by client code if we documented about the expected input assumptions.
/**
* Sum all numbers from 1 to x.
*
* NOTE: both 1 and x are included in the range.
*
* ASSUME: Input is valid, x >= 1.
*
* @param {number} x
* @return {number}
*/functionsumFrom1To(x){if(x===1)return1;returnx+sumFrom1To(x-1);}
With that, more or less we wash our hands if the function is invoked with x <= 0 and callers are responsible providing the expected input. It is a design choice. It is not inherently the correct or wrong choice, though.
We might also change to a combined approach to prevent infinite recursive calls and still document what is expected. So, besides adding that pice of info to the documentation, we can also improve the resilience of our function a little more and handle the case for when x < 1.
/**
* Sum all numbers from 1 to x.
*
* NOTE: both 1 and x are included in the range.
*
* ASSUME: Input is valid, x >= 1.
*
* @param {number} x
* @return {number}
*/functionsumFrom1To(x){if(x<1)returnNaN;if(x===1)return1;returnx+sumFrom1To(x-1);}
By reading the comment and code, it is explicitly saying that we expect x >= 1, but the function is also documenting itself in code that if x is less than 1 then NaN is returned.
One could argue that all code, no matter how complex, is self-documenting. You read the code, understanding what it is doing, and that means it is self-documenting. So, why is something considered self-documenting, while others seem to require documentation in form of comments‽ There is no single correct answer for this question. One should make use of common sense and decide for each case what seems to warrant extra information in form of comments.
Unit Tests are Also Documentation
One could also argue that like TDD, writing documentation for your code makes you think more clearly and responsibly about what you are doing. I am strongly in favor to the idea that TDD, documentation (perhaps in the form of DDD) and coding itself all combined make up for the best possible outcome in terms of code quality, long term maintainability, resilience, and usability of a code base. Add pair programming to that trio and we have the four pillars of programming enlightenment. 😂️
When you are TDDing, it makes you think about edge cases and situations that would slip through your fingers would you just code the solution to the problem, the actual implementation. If you document what you are writing, it also opens up possibilities and questions that would sometimes remain unearthed.
Each of these steps bring their value to the process and they form a mutual symbiotic relationship.
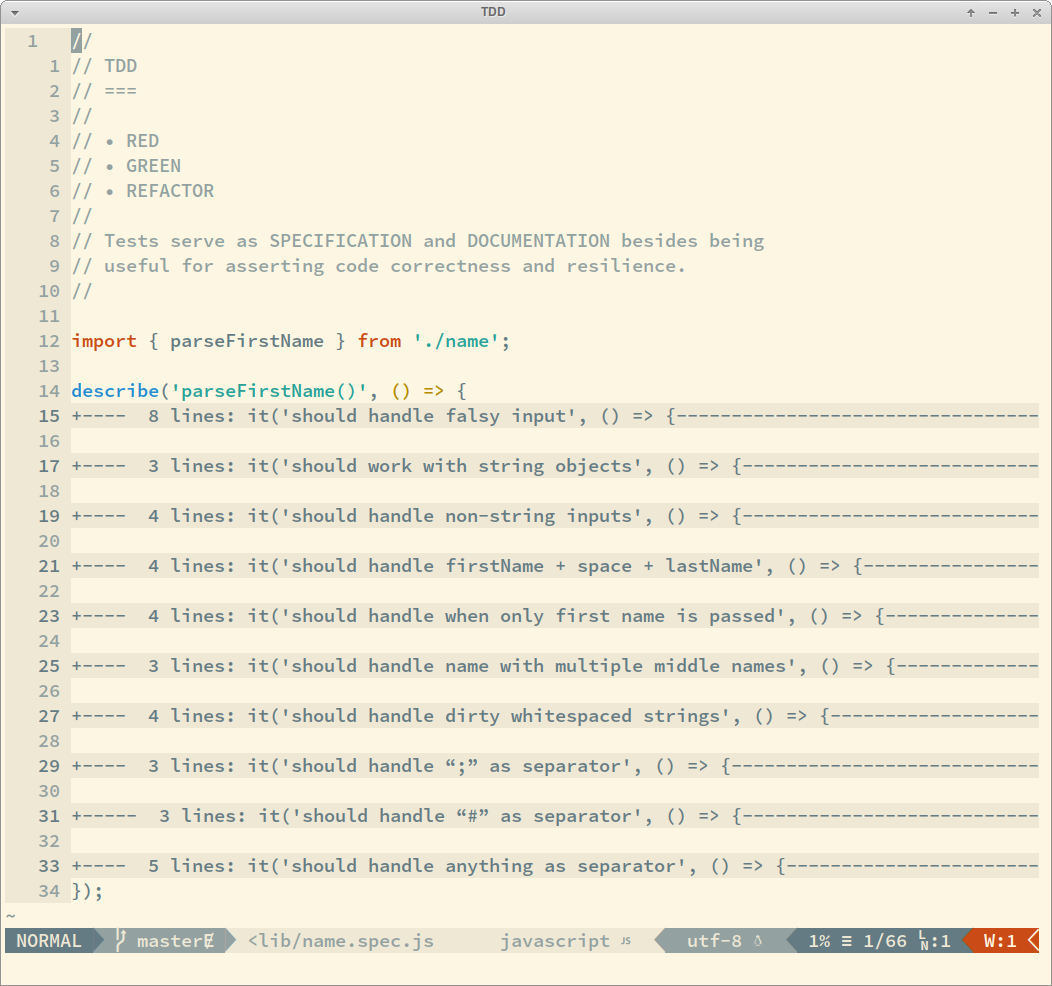
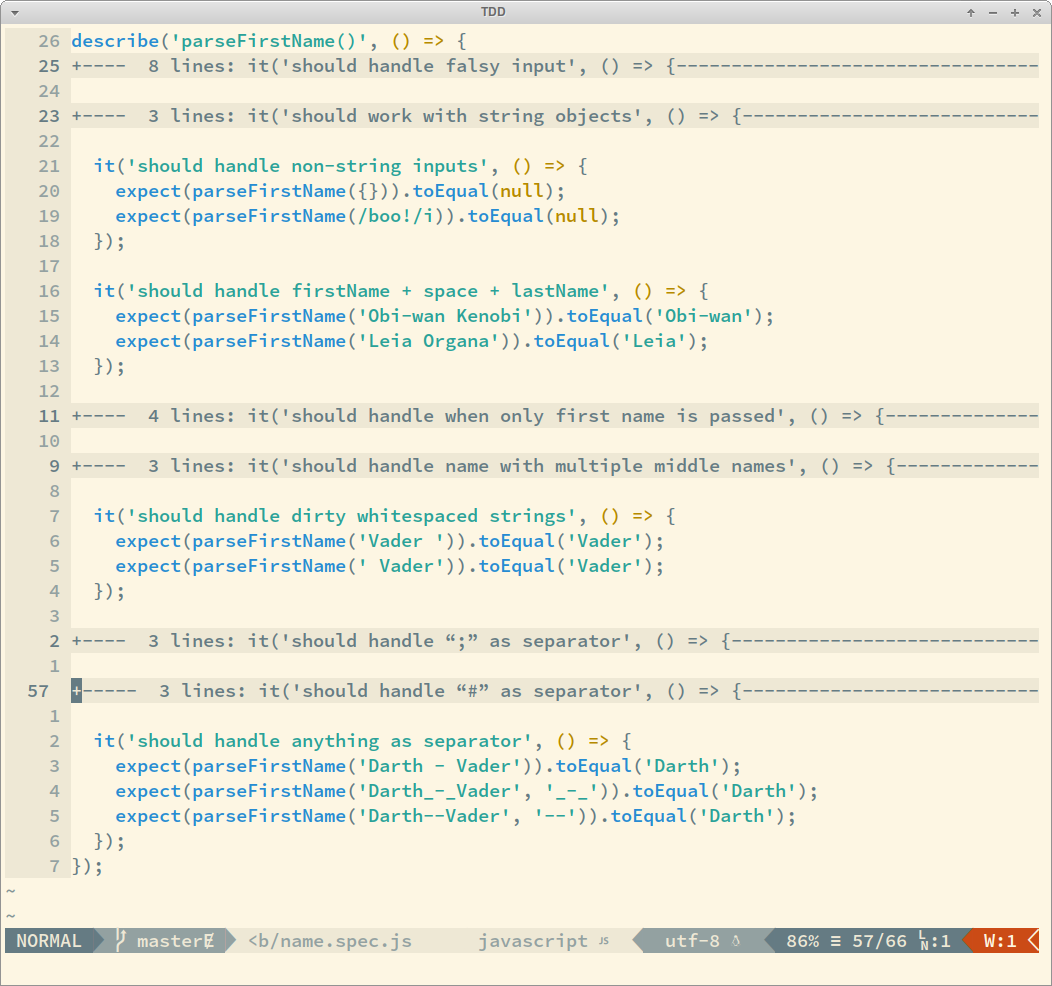
Another thing that unit tests do for us is to serve as specification and documentation about what features and behaviors a piece of code has. Each test case documents one feature, edge case, how invalid input is handled, etc.
Take a look at an example of how unit tests can give a quick overview of what a function does, how it handles things, etc.:
By reading those lines, you see that this function handles non-string inputs, strings objects (not just literals), strings padded with whitespace, etc. And if you read the code of the test cases, you would see what to expect for output given each kind and example of input.
One more time to drive the point home: unit tests make up for good specification and documentation too!
Conclusion
This is a somewhat controversial topic. Some people who have read Clean Code will say any comment is a sin, and it means the code is not good, readable and/or understandable enough. Even when a piece of code is easy to figure out, you may want to generate searchable and navigable documentation using tools like JSDoc, RDoc, HadDoc, etc. Use your best judgement when writing code and documentation.
]]>TypeScript Union Types and Type Guards2020-09-19T16:07:35+00:002020-09-19T16:07:35+00:00https://fernandobasso.github.io/typescript/typescript-union-types-and-type-guards.en
It is not uncommon that a function takes a value of some type or an object which has a property containing the value of that given type. For example, an API might return a message in the form of a string, or an object, which contains a property text from which we can read the message:
/**
* Returns the string from the parameter `msg`.
*
* ASSUME: `msg` is neither undefined nor null.
*
* @param {string|object} msg The input to get the string from.
* @return {string}
*/functiongetMsg(msg){if(msg.text)returnmsg.text;returnmsg;}getMsg('Hello!');// → 'Hello!'getMsg({text:'Superb!'});// → 'Superb!';
That is, getMsg() returns either msg.text, in case msg is an object like…
{ text: 'Deno', ...otherProperties }
…or it assumes the input msg is already a literal string and just returns that.
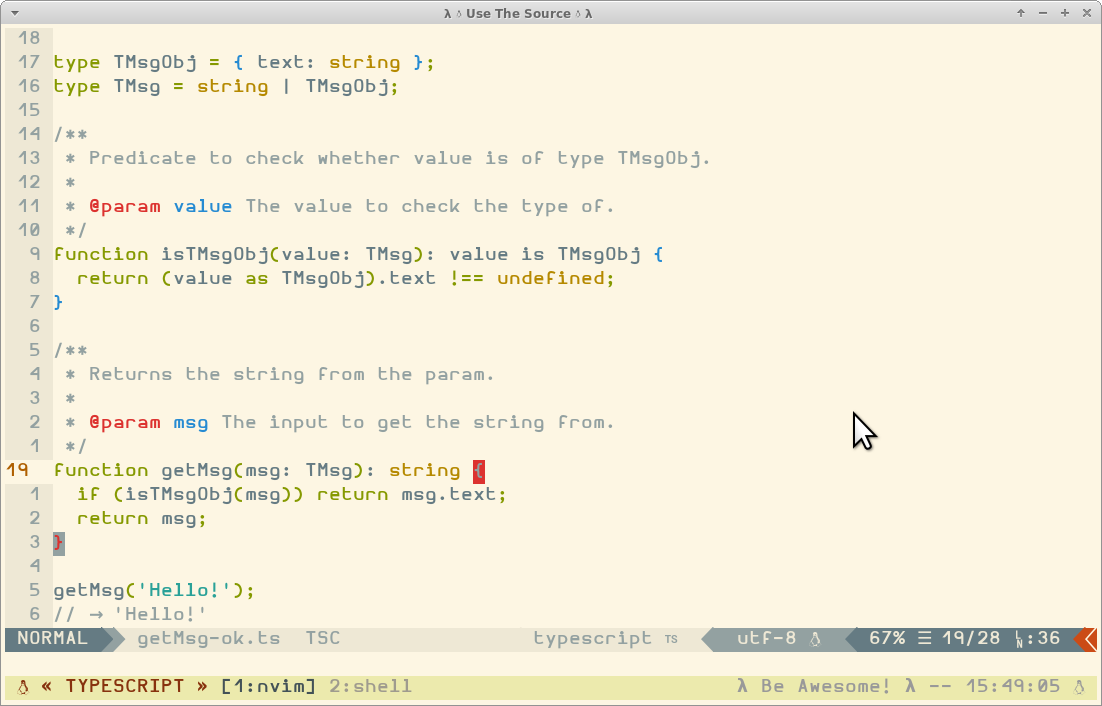
Enter TypeScript
Let’s port that implementation to TypeScript, using a Union Type for TMsg:
typeTMsgObj={text:string};typeTMsg=string|TMsgObj;/**
* Returns the string from the parameter `msg`.
*
* @param input The input to get the string from.
*/functiongetMsg(msg:TMsg):string{if(msg.text)returnmsg.text;returnmsg;}getMsg('Hello!');// → 'Hello!'getMsg({text:'Superb!'});// → 'Superb!';
But we get this message:
[tsserver 2339] [E] Property 'text' does not exist on type 'TMsg'.
Property 'text' does not exist on type 'string'.This means
How come‽ We are saying our union type takes either a string, or an object which contains a property text which is of type string. What the poop
[…] you can only access members that are guaranteed to be in all the constituents of a union type.
All in all, this means that we can’t do msg.text because although the type TMsgObj says we have a property text, the type string does not have it.
A First Working Solution
For our case, we can do something like this:
/**
* Returns the string from the parameter `msg`.
*
* @param input The input to get the string from.
*/functiongetMsg(msg:TMsg):string{if((msgasTMsgObj).text!==undefined){return(msgasTMsgObj).text;}returnmsgasstring;}
Note that we had to use msg as <some_time> a few times to please the type checker. A probably better approach is to create a predicate function to do the type checking on msg being of the type TMsgObj containing the property text.
A Better Solution: Type Guards
To solve this type problem in a more idiomatic and reusable way, we create a Type Guard.
A type guard is some expression that performs a runtime check that guarantees the type in some scope.
First, let’s write the actual Type Guard:
/**
* Predicate to check wheter param is of type TMsgObj.
*
* @param t The value to check the type of.
*/functionisTMsgObj(t:TMsg):tisTMsgObj{return(tasTMsgObj).text!==undefined;}
The magic with this is the part paramName is Type, in our case, t is TMsgObj.
According to the docs, “a predicate takes the form parameterName is Type, where parameterName must be the name of a parameter from the current function signature.”
Do note that the return of the function is a type predicate.
Then, we make use of our type guard:
/**
* Returns the string from the parameter `msg`.
*
* @param input The input to get the string from.
*/functiongetMsg(msg:TMsg):string{if(isTMsgObj(msg))returnmsg.text;returnmsg;}
Note that because we used a type guard (rather than manually using as someType), the compiler now knows that we can just return msg.text (without the as Type syntax as in the previous solution), and we can also simply return msg because according to our union type, that is the only other alternative, so, the compiler smartly enough makes sense of that!
Let’s see the two versions again just for comparison:
// Using in-place “as Type” syntax.functiongetMsg(msg:TMsg):string{if((msgasTMsgObj).text!==undefined){return(msgasTMsgObj).text;}returnmsgasstring;}// Using Type Guard.functiongetMsg(msg:TMsg):string{if(isTMsgObj(msg))returnmsg.text;returnmsg;}
The version with the type guard is cleaner, more self-documenting, more idiomatic, and helps the compiler to make right assumptions about the types.
Conclusion
Sure, TypeScript is more verbose than vanilla, plain JavaScript, but we gain type safety and can rest assured that our data flow through the application is properly handled because the compiler tells us when something could be sleeping through.
Besides that, the developer experience is greatly improved. The editor gets much smarter with suggestions, warnings, etc. It works amazingly well for me with both Vim and NeoVim, and I see very good results with other editors too! Take a look at my dotfiles for my setup if you are curious.
Node has had experimental ES6 modules support for a few versions. It was possible to use such feature if files had the extension .mjs. With the release of Node.js 12 (2019-04-23), it is now also possible to import and export modules with either the .js extension, or no extension at all.
Let’s see a quick setup example to get ES6 import/export working with Node.js 12 in a way that it does not require the file extension.
Note the ES6 export instead of Node.js’ CommonJS module.exports syntax.
Then, some other file imports the log helper.
// main.js
import log from './log';
import { info } from './log';

log('log, default export/import works!');
info('info, named export/import works too!');
Note we used ES6 import instead of Node.js’ CommonJS require syntax and we did not specify any file extension!
package.json
Now, in order for us to be able to run it successfully (with Node.js 12), we need fiddle with package.json. It needs to contain a field called type with the value module:
package.json file:
{"name":"es6-example-node12","type":"module",}
The Command Line options
And finally we can invoke node with some specific options:
The --experimental-modules option makes Node accept import/export statements. But it requires that we use either the .mjs or the .js extension when importing modules. Thankfully, we can make use of the --es-module-specifier-resolution set to node and Node.js will accept imports without extension.
With all setup and the command line properly crafted, you’ll get an output like this:
(node:13058) ExperimentalWarning: The ESM module loader is experimental.
log, default export/import works!
info, named export/import works too!
We get the warning about the experimental feature, but other than that, everything is fine.
Would you rather not see that warning all the time? Just add --no-warnings to the command line:
There are several other things to consider, pros and cons, etc. In this post, I just wanted to create a minimal example of setting Node.js 12 to make use of its experimental ES6 modules support in a quick and simple way. This is the way I myself mostly use ES6 modules: basic and simple default and named export/import, and most importantly, without having to specify the file extension. So, here we have a simple example of how to achieve that with Node.js 12.
So long.
]]>Useless Use of Functions in JavaScript2018-12-01T10:16:15+00:002018-12-01T10:16:15+00:00https://fernandobasso.github.io/javascript/useless-use-of-functions-in-javascript
Let’s take a quick look at some examples of code where people seem to misunderstand, ignore or forget basic JavaScript concepts, which cause them to end up creating unnecessary functions to perform certain tasks, sin that I myself have been guilty of in the distant and bygone first lightyears of my JavaScript odyssey.
A Warm-Up Example
To get our feet wet, let’s start with a very simple forEach example that logs stuff to the console.
Let’s say we have this log function that takes one argument and outputs that argument to the console.
constlog=thing=>console.log(thing);
And our goal is to loop over a list of strings and log each string to the console. People often do this:
['may','the','force'].forEach(function(item){log(item);});// → may// → the// → force
In the example above, we are unnecessarily creating a new function on each iteration. We create an anonymous function that accepts an argument called item just to then call the log function passing it that item argument.
We could simply do this instead:
['may','the','force'].forEach(log)
With this approach, we make the most of the fact that ECMAScript supports Higher Order Functions, and we can simply pass a function that already exists, already takes the proper number and type of arguments, and already does something we need, in this case, printing to the console. log is automatically passed the argument.
Explaining it a bit further, if we take a peek at the docs on forEach, it becomes clear that the first argument to forEach is a function that takes one (required) argument (and two other optional arguments). It is forEach’s job to pass the argument(s) to the function. Let’s examine the code again:
forEach(function (item) {
  log(item);
})
We created an anonymous function that takes an argument that we named item. The body of the anonymous function simply calls log passing it the item argument. Since our log function takes one argument, we can simply pass log to forEach and be done with it. forEach will pass each item in turn to log.
The problem is not only syntactical or a matter of elegance. When we unnecessarily create the anonymous function inside the loop, we are each time causing the engine to allocate memory for the function, instantiate it, etc., then invoke the function, and then let the garbage collector throw it away just so in each iteration of the loop we cause the engine to (unnecessarily) go over all that process… over and over again.
All this stuff reminds me of when people unnecessarily use cat and grep together on the command line (which merits them an award by the way):
cat ~/.bashrc | grep PS1
While they could simply drop cat altogether and just use grep:
grep PS1 ~/.bashrc
And here too, it is not only a mater of elegance or making code shorter. There is more to it than it meets the eye. But I digress. Let’s move on to the next example.
Doubling a list of numbers
You want to double (multiply by two) the elements of a list of numbers. We start by creating a function that doubles a number.
constdouble=num=>num*2;
Unfortunately (and to drive the point home, unnecessarily), people often do something like this:
Again, we don’t need create an anonymous function that takes an argument and calls double on that argument (as done above). It is not optimal and not very idiomatic and elegant ECMAScript. Simply do this instead:
Again, the last version does not create an unnecessary function for each element. We simply use the existing function directly. map takes care of passing the argument to double.
Arguably, these first two examples are very simplistic and unrealistic. No one would do something like using forEach to log stuff or create a double function just for the sake of it. Still, it is nice to have examples that are simple, easy and quick to run and observe the result when we are getting started with some new idea or concept.
That being said, let’s try some other scenarios that are a bit closer to real-life situations.
Applying Discounts To Products
This is a somewhat more realistic example which applies discounts to a list of products.
First let’s have a look at our products and the function that applies the discount to a product.
constproducts=[{title:'Lightsaber',price:1000,discountPercentage:10},{title:'Darth Vader Helmet',price:400,discountPercentage:7},{title:'Millennium Falcon',price:750000,discountPercentage:12},];/**
* Calculates and dds `discount` and `totalToPay` properties to a product.
*
* @param {object} product
* @return {object}
*/constcalculateDiscount=product=>{const{price,discountPercentage}=product;constdiscount=price*discountPercentage/100;consttotalToPay=price-discount;return{...product,discount,totalToPay};};
The calculateDiscount function takes a product, calculates the discount value based on price and discountPercentage, and calculates the total to pay by making use of the already-calculated discount. It then returns the product with those two new properties added. Therefore, if a product’s price is U$ 80.00, and the discount percentage is 5%, the discount amount is U$ 4.00 and the total to pay is U$ 76.00.
Here is the approach with the useless use of an anonymous function:
But the output is not the heart of the matter here. What we are concerned about is that we do not need to create a brand new function on each iteration of the loop.
Why creating an anonymous function that takes product as argument, and in turn calls calculateProduct passing that product as argument. That is a big no-no. We can simply pass calculateProduct to map, and map itself takes care of passing each product to our function.
I swear by the haven, the earth and the abyss that you would live a happier and more fulfilling life if you just did this instead:
Besides being shorter and arguably more elegant, we do not waste CPU cycles and memory by going to the process of creating a brand new (and useless) function for each product that is mapped on. All in all, the second approach it is more idiomatic, performant and professional code.
Get ready for yet another example.
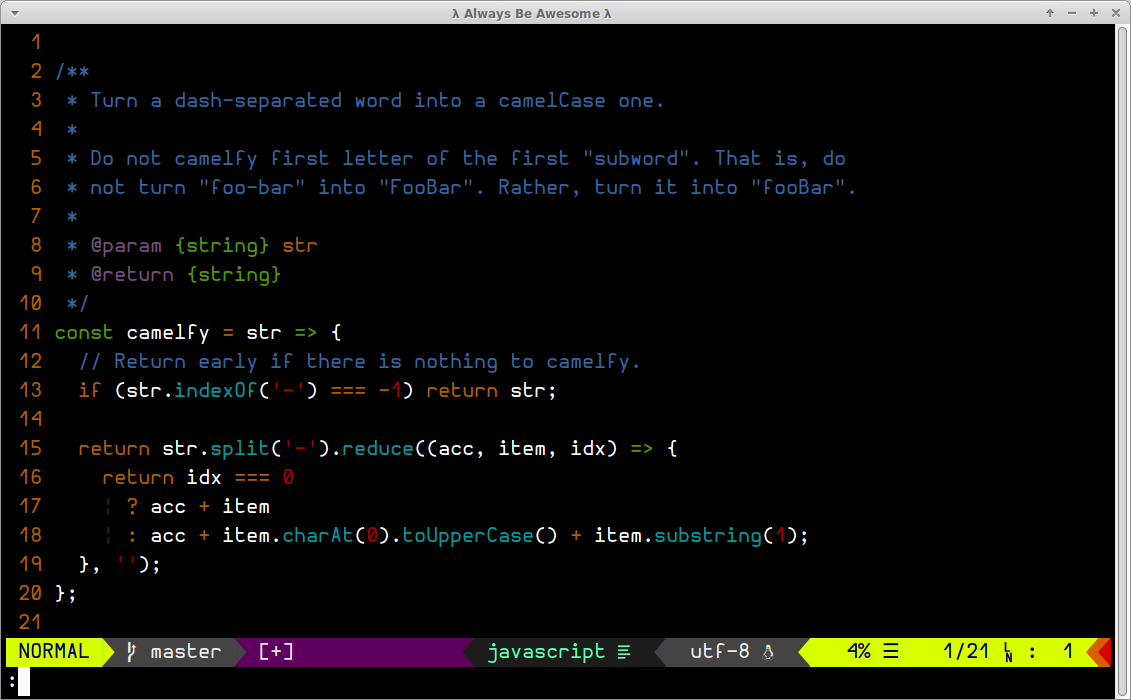
Camelfy Dash-Separated Words
It is a somewhat common task to “camelfy” words like font-family or line-height that we use in CSS to convert them to their JavaScript counterparts like fontFamily and lineHeight. One such helper function that could perform such thing is as follows:
/**
* Turn a dash-separated word into a camelCase one.
*
* Do not camelfy first letter of the first "subword". That is, do
* not turn "foo-bar" into "FooBar". Rather, turn it into "fooBar".
*
* @param {string} str
* @return {string}
*/constcamelfy=str=>{// Return early if there is nothing to camelfy.if(str.indexOf('-')===-1)returnstr;returnstr.split('-').reduce((acc,item,idx)=>{returnidx===0?acc+item:acc+item.charAt(0).toUpperCase()+item.substring(1);},'');};
And to use it on a list of properties, there are two main ways: the award-winning useless use of anonymous function approach, and the idiomatic, elegant, performant and professional one.
Here’s a list of css properties that we want to camelfy:
At this point you already know the drill, but I’ll repeat the concepts nonetheless. We don’t need to create an anonymous function that takes an argument, and then, inside that anonymous function call camelfy and pass it that argument manually. We can completely and intentionally not use an useless anonymous function, and just pass map the camelfy function directly, and map will pass the argument to camelfy.
An Asynchronous Fetch Example
Let’s also study an example that uses an asynchronous operation to request data from a server somewhere, since that is something we do all the time.
We have this function that takes some response data, parses it into json and then returns a list of gist descriptions:
/**
* Returns a list of gist descriptions.
*
* Parse response data into json, then filter out gists with
* an empty description.
*
* @param {Response} res
* @return {array}
*/vargetGistDescriptions=asyncres=>{constgists=awaitres.json();returngists.reduce((acc,{description})=>{if(description==='')returnacc;return[...acc,description];},[]);};
In the snippet above, two (useless) anonymous functions are created. One that gets the response and passes it along to getGistDescriptions and another one that that gets those descriptions and passes them along to log.
But since getGistDescriptions already takes a response object to parse and filter, and log already takes an argument to log to the console, we can intelligently drop those meaningless anonymous functions and do this instead:
It works because then takes a function as argument. And the function that then takes must accept one argument. then takes care of passing the argument to the function. Both getGistDescriptions and log happen to have the exact signature that then expects. Cool, huh‽
Of course, one would not just log the gist descriptions to the console, but perhaps create a list of h2 tags and then insert them into a web page. Still, it should be a good way to visualize and understand what is going on.
Conclusion
I did not mention it, but the more idiomatic versions of the examples shown in this post are more or less a consequence of applying Functional Programming concepts on top of JavaScript’s support of this style of programming (because JS has Higher Order Functions and many other related goodies). Mind you I’m not even arguing in favor of Functional Programming. It is just that all those unnecessary anonymous functions only make code lengthier, less idiomatic and less performant.
If you want some more insights into this subject, I recommend that you take a look at this chapter of the incredible (and awesomely free) Mostly Adequate Guide To Functional Programming Guide Book.
So long.
]]>Shell Script to Create Passwords as Required by Locaweb Hosting Services2018-05-06T09:37:00+00:002018-05-06T09:37:00+00:00https://fernandobasso.github.io/shell/shell-script-generate-passwords-locaweb.enIntroduction
I host some websites and applications on Locaweb. When creating databases or email accounts, they only allow certain special characters to be included. The problem is that you first have to submit the password before they show you which special characters are allowed (a very annoying behaviour; they should show that before letting the user attempt to submit the form).
I tried using some tools to generate the password, like openssl rand … and pwgen, but I could not bend those to my will of creating passwords following the constraints required, so I decided to make something myself.
Note
I do not claim my script/approach is secure, or smart, or whatever. It just worked for my needs.
The Script
pwlw.sh.
#!/bin/bash# Author: Fernando Basso# Email: fernandobasso.br@gmail.com# Tested to work on bash >= 3.2 but it probably works# on version 3.0 and 3.1 as well.# No external dependencies are required besides `cat'.# Min length of passwords.min=4
# Max length of passwords.max=48
# Default length of generated passwords.pwlen=11
## Display usage help.# @param number: exit status#function usage (){# Default exit status is zero.exit_status=0
if[[$1]];then
exit_status=$1fi
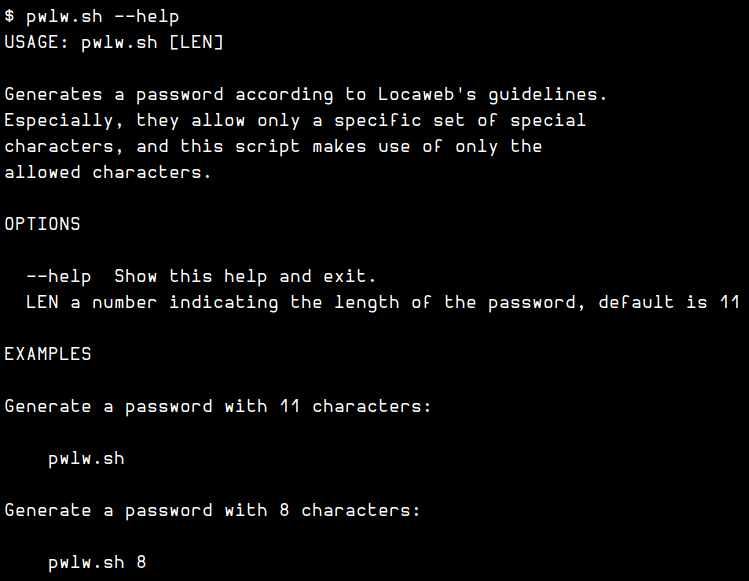
cat<<EOF
USAGE: ${0##*/} [LEN]
Generates a password according to Locaweb's guidelines.
Especially, they allow only a specific set of special
characters, and this script makes use of only the
allowed characters.
OPTIONS
--help Show this help and exit.
LEN a number indicating the length of the password, default is 11
EXAMPLES
Generate a password with 11 characters:
${0##*/}
Generate a password with 8 characters:
${0##*/} 8
EOF
exit$exit_status}# If we have the paramter --help or a number.if[[$1]];then# If it is indeed a number.if[[$1=~ ^[0-9]+$ ]];then# It can't be too small or too large.if[[$1-lt 4 ||$1-gt 48 ]];then
printf'\n!!! Password must be between %d and %d characters long!!!\n\n'$min$max 1>&2
usage 1
else
pwlen=$1fi
elif[[$1==--help]];then# If they asked for help, exit status is zero.
usage 0
else# Some incorrect ivokation of the script. Exit status 1.
usage 1
fi
fi# Locaweb admin panels accepts these, and only these special chars.locaweb_chars='-@!*_:=#/{}[]'nums=0123456789
lower=abcdefghigklmnopqrstuwxz
upper=ABCDEFGHIGKLMNOPQRSTUWXZ
lwchrs='-@!*_:=#/{}[]'# Using $lwchars twice so special chars have a bit# more chances of being picked.allowed_chars="${lwchrs}${nums}${lower}${upper}${lwchrs}"# Get random number from 0 to length of `lower'.i=$(((RANDOM %${#lower})))# Locaweb passwords require first character to be a letter.# We have just assumed a lowercase first letter is good enough.first_char=${lower:i:1}pw=$first_charwhile[${#pw}-lt$pwlen];do# i is a random number between zero and length of allowed_chars.i=$(((RANDOM %${#allowed_chars})))
pw+="${allowed_chars:i:1}"done
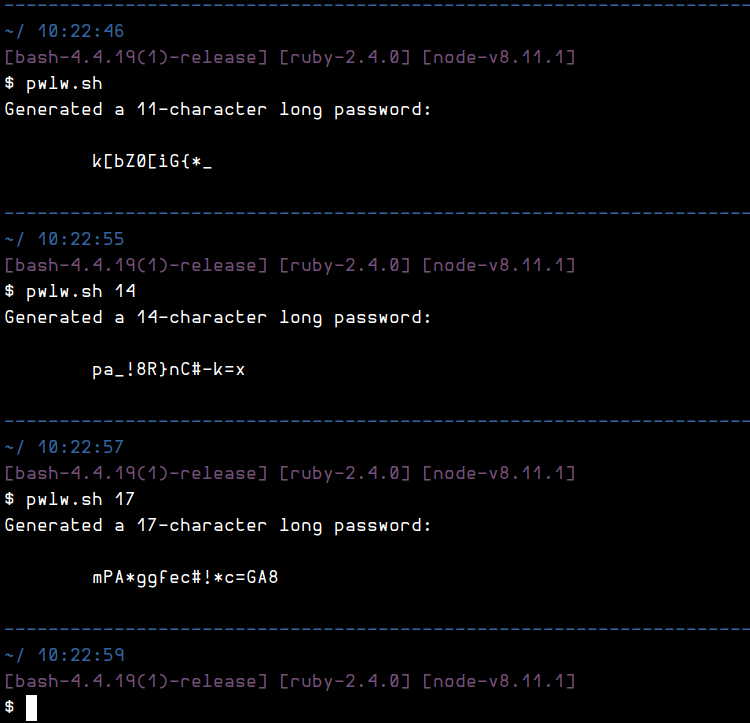
printf'Generated a %d-character long password:\n'"${#pw}"printf'\n\t%s\n'$pw
]]>Shell Script to Set CPU to Performance Game Mode as Recommended By Feral Interactive To Play Games on Linux2018-04-25T09:11:23+00:002018-04-25T09:11:23+00:00https://fernandobasso.github.io/shell/shell-script-gamemode-feral-interactive-linux-games.enIntroduction
Feral Interactive has been doing an amazing job porting games to Linux. Way to go, Feral! I have played several of their ported games on Linux (my distro of choice is Arch Linux), like Alien: Isolation, Tomb Raider, and Hitman. In 2018 Feral released Rise of Tomb Raider for Linux as well. Since this game is very demanding in terms of hardware capatilities, they recommend Linux users to set CPU governor to performance in order to play it (and other games too, actually).
So, let’s see how to do it.
The Script
Feral actually has a faq explaining the commands to set CPU governor to either performance (for playing games) or powersave (for when you are using the computer for ordinary tasks that do not require that much power).
Since it is a bit harder to remember the whole path and command line used to set it, I decided to make a shell script to run the actual commands. Check the script on gitlab.
set CPU to either performance or powersave.
#!/usr/bin/env bash## This script sets all available CPUs to either# 'performance' (for playing games, for instance)# or 'powersave'.## I Made this script based on the information from:## https://support.feralinteractive.com/docs/en/riseofthetombraider/1.0.3/linux/faqs/#i_cpu_governor## Instead of this script, you may want to use the 'gamemode' (open source)# tool by Feral Interactive:## https://github.com/FeralInteractive/gamemode## Way to go, Feral!## USAGE:# ------## Download this script and save it as `cpu_governor.sh` then# just run it like this:## bash cpu_governor.sh --performance## or## bash cpu_governor.sh --powersave## Of course, if you have more experience with Linux, you can also make it# executable, add it your some directory in your PATH and just run it like# any other command.## NOTE: This script assumes you have `tr', `sed', `wc' and `bash' at least# version 3.2 installed. This should be the no problem for any Linux# distribution as of 2018.## NOTE: We also assume you have `sudo' installed and you are in a group that# allows you to used `sudo'. This is the default on Ubuntu and derived distros.# For Arch Linux (also useful for other distros), check:## https://wiki.archlinux.org/index.php/sudo## Checking the current mode# -------------------------## To check in which mode your CPUs are currently in, check one# of your CPUs, example:## cat /sys/devices/system/cpu/cpu2/cpufreq/scaling_governor#
usage (){script_name=${0##*/}cat<<TOMBRAIDER
Run with: ‘%s’ or ’%s’\n' '--powersave' '--performance'
Examples:
$script_name --performance
or
$script_name --powersave
You may also use '--dry-run' as the second argument, in
which case no real configurations will be made, but the
script will just print what it _would_ do:
$script_name --performance --dry-run
or
$script_name --powersave --dry-run
TOMBRAIDER
exit 0
}if[[$# < 1 ]];then
usage
fi
mode=''case"$1"in--po*)mode=powersave
;;--pe*)mode=performance
;;*)
usage
;;esactry=''if[["$2"=='--dry-run']];then
try='--dry-run'fi# Replace tabs with spaces.# Squeeze multiple spaces to one space.# Match lines '^processor : <num>$'. Not all SEDs support `[0-9]\+'.# Count those lines.# Delete '\n' produced by previous command.num_processors=$(cat /proc/cpuinfo \
| tr'\t'' '\
| tr-s' '\
| sed-n'/^processor : [0-9][0-9]*/p'\
| wc--lines\
| tr-d'\n')# Perform the actual config.for(( num = 0; num < $num_processors; num++ ));do
if[[$try=~ --dry-run]];then
printf"Would set CPU '%d' to '%s'\n"$num$modeprintf"echo \"$mode\" | sudo tee \"/sys/devices/system/cpu/cpu${num}/cpufreq/scaling_governor\n"else
printf"Setting CPU '%d' to '%s'\n"$num$modeecho"$mode" | sudo tee"/sys/devices/system/cpu/cpu${num}/cpufreq/scaling_governor"fi
done
]]>Unit Testing Vue/Vuetify With Jest and Vue-Test-Utils2018-02-02T09:27:00+00:002018-02-02T09:27:00+00:00https://fernandobasso.github.io/javascript/unit-testing-vue-vuetify-with-jest-and-vue-test-utils.enIntro
To get started, create a directory and init a project inside that directory:
We need a bunch of packages to get things going. I learned what was needed by reading vue-test-utils guide for jest and vue single file components and some more stuff from the jest documentation. Still, I had some errors when trying to run the tests that more more or less guided me to install some more packages. All things put together, I ended up with this package.json file:
First, note the test script to run jest against a set of files in the tests directory.
Then, see the "jest" configuration section, which is very important. In the "transform" section we have vue-jest and babel-jest that makes sure jest can test stuff from our .vue single file component files.
This will tell jest to include jest-setup.js initialization file for your tests.
After making sure your package.json file has the necessary dependencies and devDependencies and configurations similar to the one shown above, run:
npm install
babelrc
We also need a properly configured .babelrc. This worked fine:
What maters for tests is the "env.test" section. The "presets" section has nothing to do with tests and is used by your module bundler.
jest-setup.js
This file could have any name you like, just make sure it is correctly specified in package.json. For our case, we don’t even need this setup file, but let’s include it as it serves as an example on how to do it and it is ready to use when we happen to need more initial configuration for jest unit tests.
file: tests/jest-setup.js.
//// package.json has a section that instructs jest to// read this setup/startup file.//importVuefrom'vue';// DON'T DO THIS or you'll have problems like <v-btn :to="..."> rendering// as <router-link> instead of <a href="..."> on the unit tests.// See tests/Foo.spec.js to learn how to use Vuetify in the unit tests.//import Vuetify from 'vuetify';//Vue.use(Vuetify); // NO, DON'T DO THIS.// You may not need this. Uncomment only if you see some sort of// regeneratorRuntime error.//import 'babel-polyfill';// So we don't see unnecessary Vue warnings about production.Vue.config.productionTip=false;
Foo.vue, the component to unit test
file: src/Foo.vue.
<template><v-containergrid-list-mdindex-of-things><v-layoutitem-index-rowindex-rowrowwrapalign-centerv-for="(item, idx) in items":key="idx"><v-flexxs12sm6><div></div></v-flex><v-flexxs12sm6wrap-btn><v-btnclass="btn-edit"color="blue"tag="section":to="{ name: 'item-edit', params: { item_id: item.id }}">
Edit
</v-btn></v-flex></v-layout></v-container></template><script>exportdefault{data(){return{// Note that we have two items by default.items:[{id:1,name:'Foo'},{id:2,name:'Bar'}]};}};</script>
In this component, we are iterating over the items array, and we display them on the UI using some Vuetify components.
tests/Foo.spec.js, the unit test file
Finally, our test file.
file: tests/Foo.spec.js.
import{mount,createLocalVue}from'@vue/test-utils';importVueRouterfrom'vue-router';importVuetifyfrom'vuetify';importFoofrom'../src/Foo.vue';describe('Foo',function(){letwrp;constroutes=[{path:'/items/:item_id/edit',name:'item-edit'}];constrouter=newVueRouter({routes});beforeEach(()=>{constlocalVue=createLocalVue();localVue.use(VueRouter);localVue.use(Vuetify);wrp=mount(Foo,{localVue:localVue,router,});});// `it' and `expect's ready to go now.});
Okay, let’s take a look at what we have done here, because this is the part that interest here the most for this post.
We import everything we need for this test. Note that Vue itself is not imported.
Some routes are necessary. In our component, we are just using the edit route so we define just that one.
Create an instance of VueRouter.
Before each test, we create a local Vue instance (take a look in vue-test-utils docs why we do this) and make it aware of our routes. Since our component uses :to and uses our named route, our tests need to provide the router with that route named route-edit for things to work.
We also make our localVue aware of Vuetify. This is very important. we should not make a global Vue instance aware of Vuetify. That is, we should not do Vue.use(Vuetify) (look at the comments in tests/jest-setup.js, and also take a look at this question on the vue forums).
Then we mount the component passing it localVue and router. From this point, we should have no trouble unit-testing our component.
Some Tests
We get to the actual tests. Things should be more or less self-explanatory, and I also added comments to explain certain decisions.
Let me make some more notes here, though.
v-for Does Not Display Items
Vue’s v-for directive does not display the element it is in if there is nothing to iterate over. That is why, the element with the class .item-index-row should not even be in the DOM should we not have any items.
it('does not display element if there are no items',()=>{// No items to display.// NOTE: By default, our component has some items, but we use// setData() here to override it with an empty array of tiems to// make sure we have not items at all and our test works as// expected.wrp.setData({items:[]});expect(wrp.find('.item-index-row').exists()).toBe(false);});
v-for Displays Items
Here v-for has items to iterate over, so, Vue goes ahead and inserts stuff on the DOM.
it('displays element when there are items',()=>{// Some items to display.// NOTE: By default our component has some items, but we use// setData() here providing an array with at least one item so// we can be sure we have items and therefore our UI _should_// indeed display that .item-index-row element.wrp.setData({items:[{id:1,name:'My Item'}]});expect(wrp.find('.item-index-row').exists()).toBe(true);// And we also expect to see the text 'My Item' in there.expect(wrp.find('.item-index-row').html()).toMatch(/My Item/);});
Display Exactly N Items
If we have three items to display, according to our component, we should have three .item-index-row elements.
it('displays N rows when there are N items',()=>{wrp.setData({items:[{id:1,name:'Item 1'},{id:2,name:'Item 2'},{id:3,name:'Item 3'}]});// findAll returns an array, and an array has the length property.expect(wrp.findAll('.item-index-row').length).toBe(3);});
Render Vuetify VBtn as Anchor Tag
And our <v-btn> Vuetify component must be rendered as an anchor tag that links to the edit form for the item in question.
it('should render btn as anchor tag with proper edit url',()=>{// Not using setData() here. Just assume we have some items in// the component (our example component does indeed have two// default items). This may or may not be a good approach. It// varies from component to component and from project to// project. Assess your own situation and decide for yourself.letbtn=wrp.find('.btn-edit');// Each item displayed should have an edit link. Our component// uses <v-btn> with the `:to` attribute. That makes it an <a>// tag, a link.expect(btn.exists()).toBe(true);// And it should route to /items/<id>/edit url.expect(btn.element.href).toMatch(/items\/\d+\/edit/);});
Vuetify Components Render as Normal HTML
And we should see that all Vuetify components are rendered as HTML.
it('should have a happy ending',()=>{// You should see all Vuetify components properly rendered// as normal HTML tags. For example, <v-flex> should be// rendered as <div class="flex ...">expect(wrp.contains('div.flex')).toBe(true);// Just so that you can visually inspect the rendered html.console.log(wrp.find('.item-index-row').html());});
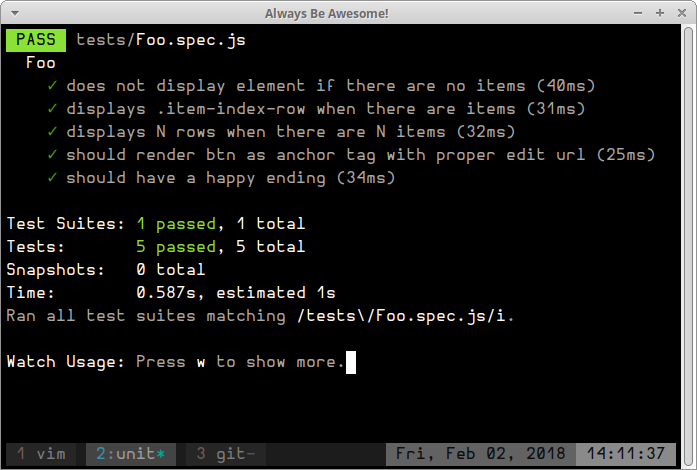
Here’s a screenshot of the tests output for you to enjoy!
What About Webpack‽
You may have noticed we did not even speak about Webpack, or any other module bundler for that matter. That is because jest, with the help of babel-jest handles our javascript code without the need of configuring webpack. We just need a .babelrc with a proper env.test property set (as we did) which is used by the test environment only. Just as a reminder (because we already menioned this), we aslo used jest-vue to transform our Vue SFC (Single File Components) to javascript, which is then handled by babel-jest and then finally handed over to jest.
So, yeah, you will have a module bundler taking care of your code but that is not necessary for the sake of unit tests alone with jest and vue-test-utils.
Feel the force. See the force. Be the force!
]]>Login Redirect Loop on Laravel in Production2017-10-27T07:16:11+00:002017-10-27T07:16:11+00:00https://fernandobasso.github.io/web-development/laravel-deploy-login-infinite-redirect-loop.enIntroduction
Some days ago I finished developing some first working features of a web application in Laravel. Working fine locally, authentication, some authorization roles, all fine and dandy.
When I deployed it to the live, production server, the public area could be accessed just fine, but the admin area was impossible to reach: an infinite redirect loop.
Why would login work locally but not on the production server‽ Well, let’s see.
Debugging
I started a simple debugging process which was painful because I had to change something locally and upload to production to see what would happen, since the local app was OK and did not present the same login infinite redirect loop problem.
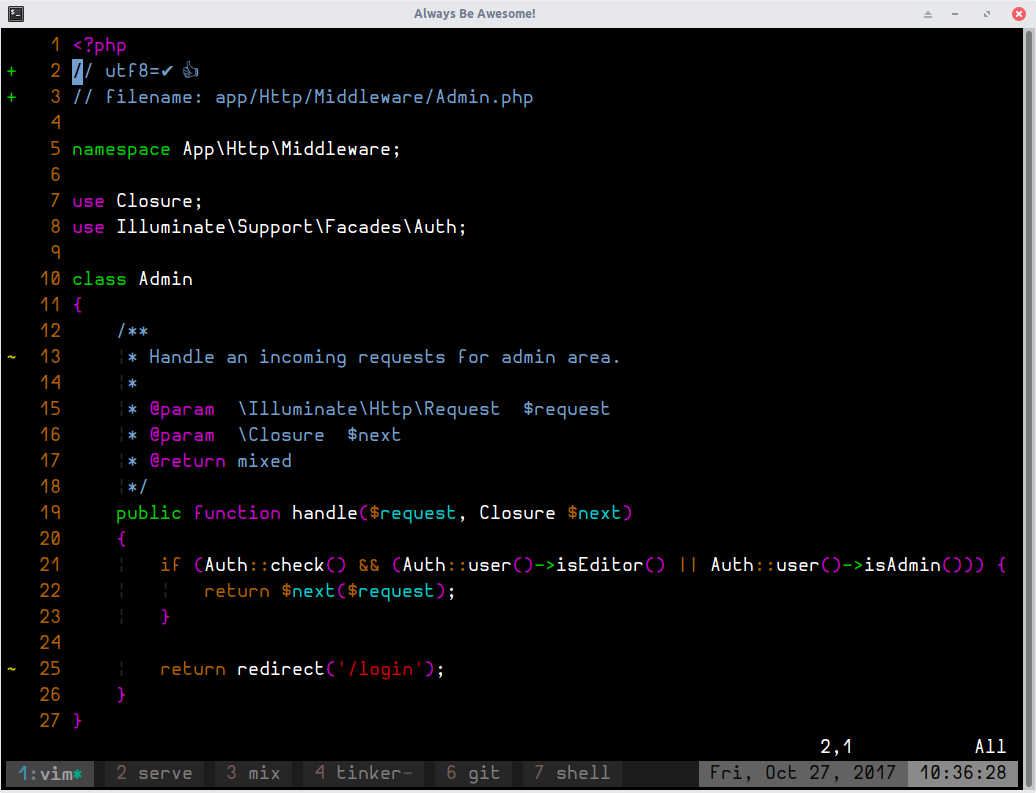
I disabled the auth middleware for the admin routes. No change same problem. Then I disabled a middleware I had created myself to handle roles. It was called admin and it is like this:
Simple enough, right‽ But do note the triple equal sign comparison operator I am using.
Let’s Tinker for a Moment…
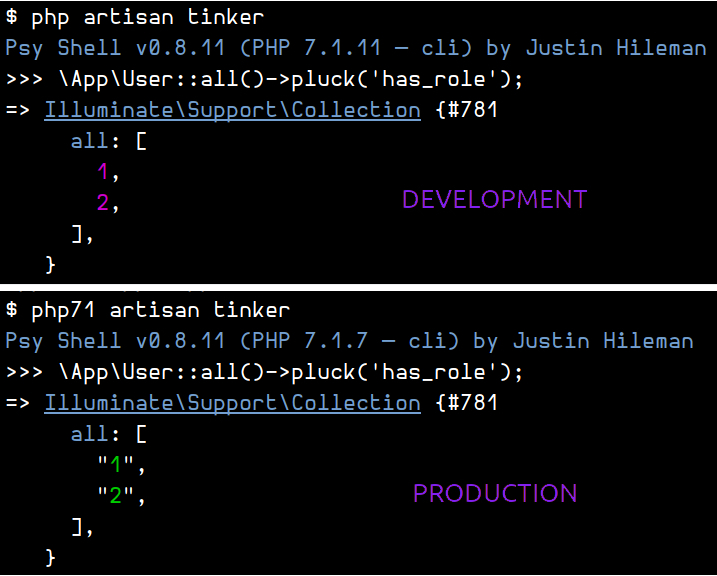
I used tinker on my local and production environments. Take a look:
I did immediately spot the difference. The local development returns has_role as numbers, integers, while the production side says they are strings! How come‽ Moreover, recall I am using triple equal sign comparison operators in my Admin middleware? Yes, those two things combined resulted in the infinite redirect loop problem for the admin area.
I then changed === with == on the Admin middleware methods, and indeed, the problem on the production side was gone. Everything working fine!
The question is why has_role values were integers locally, and strings on the production environment.
Why Different Data types?
When I deployed the application, I didn’t have seeds for the admin users, and I thought it would be just fine if I exported the local users from the DB and imported them on the production database, therefore, I did this (I am using MariaDB):
I thought, “of course, the data traveled through the network (mysql client/server communication happens through TCP) and became strings!” Then I tried doing this on the server:
// Attempt to update has_role to 1, a number.\App\User::find(1)->update(['has_role'=>1]);\App\User::all()->pluck('has_role');// → "1"// → "2"
Nope, the numeric strings were still there… Then I tried through the mysql cli itself:
UPDATEusersSEThas_role=1WHEREid=1;
But the problem persisted. PHP, Tinker and the Laravel application still thinking that 1 in the database is "1". No, the problem doesn’t seem to be because of the way I populated the users table on the server.
PDO + mysql vs PDO + mysqlnd
Researching a little more, I found some people saying that PHP + PDO with the mysql extension poses that problem, while mysqlnd extension does not.
Indeed, doing php --info showed this on my local, development box (running Arch Linux):
PDO Driver for MySQL => enabled
Client API version => mysqlnd 5.0.12-dev - 20150407 - $Id: b396954eeb2d1d9ed7902b8bae237b287f21ad9e
And this on the server:
PDO Driver for MySQL => enabled
Client API version => 5.6.36-82.0
The “Solution”
I decided the solution for now was just to use == instead of === in my Admin middleware. I have other applications on this server and would probably be unwise to attempt installing the mysqlnd extension.
The lingering question is: what would have been the best approach in the first place that could have avoided the problem and saved me some hours of debugging and experimenting?
I am not perfect and still seeking enlightenment…
]]>Copying and Pasting To and From the System Clipboard On The Command Line2017-05-25T18:00:00+00:002017-05-25T18:00:00+00:00https://fernandobasso.github.io/shell/copy-paste-from-command-line-xclip-xsel-clipboardSometimes it is useful to handle the clipboard and the primary selection (on *nix) systems using the command line. Let’s see some examples on how to do that using two programs, xclip and xsel.
Clipboard vs Primary Selection
On *nix systems running a graphical display through Xorg, we have the clipboard area, and the primary selection. The clipboard is where Xorg stores text (or other content) you copy from programs with C-c, for example. The primary selection stores text that is currently selected, like when you drag the cursor over some text, which can be pasted by clicking with the mouse wheel.
About xclip and xsel
On Arch Linux I had to install both programs:
# Arch Linux
pacman -S xclip xsel

# Probably something like this on deb and rpm based distros:
apt-get install xclip xsel
dnf install xclip xsel
# or
yum install xclip xsel
xclip has options like -selection, and they can be abbreviated to shorter names (like -sel or even -s) as long as they do not conflict to other options. For example, -v cannot be an abbreviation because it could mean -verbose or -version. clipboard could be abbreviated to clip or even c. Check the man pages/help to know more.
Note that xclip parameters always start with a single -, like in -version. xsel has long and short names. Long names use -- like in --output and a single - for the short version, like in -o.
You’ll likely want to try these commands out instead of just reading about them. For that you can use an external tool, like a text editor to copy/paste and see if your commands for copying and pasting from the command line are working as expected. Just make sure to copy and paste either using the clipboard or the primary selection accordingly. For instance, if you copy from the command line to the primary selection, make sure you attempt a paste by clicking the mouse wheel, otherwise you may mistakenly think the commands are not working.
Note
Although xclip sounds like “X clipboard” and xsel sounds like “X selection”, both programs can handle both the clipboard and the primary selection.
xsel has -p as the short version for --primary and -b for --clipboard. Again, check the man pages for syntax details. You might also like to read link:/shell/reading-and-understanding-command-line-documentation.html[my post about man/info pages].
Here we copied to the primary selection. Try to paste it somewhere clicking with the mouse wheel.
To exemplify we used simple echo commands. Of course, the source text could come from more useful/complex commands or even shell redirections.
# filter and process ip command output and copy to primary selection.
ip addr show | grep-E'inet6? ' | tr-s' ' | cut-d' '-f 3 | xclip -sel p
# Get only the usernames from the passwd file.sed's/:.*$//' < /etc/passwd | xsel --clipboard
Note that we used xclip -sel p as abbreviation for xclip -selection primary. We’ll use other abbreviations from now on for xclip.
Using Redirects Instead of Pipes
You could also do things like this:
# Using a here string.
xclip -in-sel clip <<<'Using a Shell HERESTRING!'# Or a here document.
xsel --clipboard<<HDOC
> How
> are you
> doing‽
> HDOC
Or even a mix of command substitutions with other things, like a here string.
xsel <<<$(~/bin/myprogram /path/to/file)
Contents of Files
We can also get the contents of text/source files (well, any file at all) and send to the system’s clipboard or the primary selection.
Outputing Contents of Clipboard and Primary Selection
Okay. We now know a bunch of ways to copy data either to the clipboard or the primary selection? How do we output that data to a file, STDOUT, or somewhere else?
Let’s see some examples!
xclip -out-sel clip
xsel --clipboard
xslip -out-sel pri
xsel --primary
Sending Contents of The Clipboard and Primary Selection to a File
Sending to a file requires shell redirections because by default the text is sent to STDOUT.
Vim can read from STDIN if you start it with the with the - argument . Therefore, to send data with xclip or xsel to vim, we do:
# using pipes
xclip -out-sel clip | vim -
xsel | vim -
# or, with a subshell and herestrings
vim - <<<$(xclip -out-sel pri)
vim - <<<$(xsel --clipboard)
Final Notes
Using these commands to copy and paste to and from the X clipboard and primary selection is interchangeable with copying and pasting from other programs. For instance, you can copy text from your browser and use it with xclip or xsel, or you can copy text with xclip and xsel and then paste it in your browser.
And there you have it! Some examples (from which you can always expand upon) that I use myself from time to time, especially because the command line is part of my entire workflow. I hope you have enjoyed it.
And the last, lingering thing I wanted to say all along:
man xclip
man xsel

xclip -help
xsel --help

vim +help\ starting.txt